Chat Application Project using Socket Programming in Java
The "Chat Application" is a Desktop-Based application and it is a Networking project. I have made this project using Java using the concept of Socket programming. To make a chat session using socket programming, we used the "Socket" class of java to implement a TCP socket connection between the Chat Server and the Chat Client.
The project is developed using JAVA SWING.
WHAT IS SOCKET PROGRAMMING?
- Socket programming is a concept of NETWORKING. Socket programming is a way of connecting two nodes on a network to communicate with each other/

- One Socket (SERVER) listens on a particular port at an IP, while other sockets (CLIENT) reach out to the other to form a connection.
- server form the listener socket. while the client reaches out to the server.

- Once their port number match, they'll get connected.

NOTE: (Click Me to check all the available projects)
Now let's take a look at Project.
- For starting the project first we have to start the server, So Let's try to start the server.

- Whenever we try to run the server, we have to enter two details:
1) NAME
2) PORT NUMBER
- And both fields are compulsory, I have validated each field.
- Now let's enter our detail and start the server.

- After pressing the start button our server will start. and we will be able to see the following interface.

- Now, Let's try to start the client.

- Again for starting the client, we have to enter some details like NAME, PORT NUMBER, and IP ADDRESS. Here in place of the IP address, I will enter 127.0.0.1 because I'm running both client and server on the same machine.

- Now since the Client's port number is the same as the Server's port number. That's why the Client and Server will connect now and we will be able to see the following interface.

- And now the Client and Server can chat. So, Let's chat now.

- As we can see in the above screenshot, the Client and Server can chat with a proper timestamp. And I have also added a scroll bar to scroll the chats.
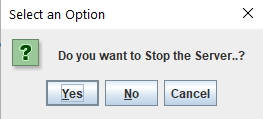
Now, Let's disconnect the Client. So, Whenever we press the BACK button on the client-side we will be able to see the following interface.

- If we press yes then the CONNECTION will get CLOSE.

- And If we want to CLOSE the SERVER. Press the BACK button on the server side and press Yes.

Other practical projects
Other practical projects using React & Spring Boot
I will give you the full project SOURCE CODE and I will do a COMPLETE SET-UP of the project on your PC or Laptop remotely.
Or You can simply Request for the Project Source Code & Set Up by clicking on the below button.
MAIL ME AT codewithmurad@gmail.com
DM ME ON INSTAGRAM at @codewithmurad
DM ME ON FACEBOOK at @codewithmurad
DM ME ON TELEGRAM at @codewithmurad
Connect on My Discord Server: CLICK HERE
.png)
.png)
0 Comments