As we can see our watch type got added here. In a similar manner, Admin can add the brands. So, let's add the brand as a Brand demo.
So, after clicking on Add Brand our brand will get added to the database and it will show us the message on the screen brand was added successfully, now it will also be visible in our application so let's check whether it got added or not.
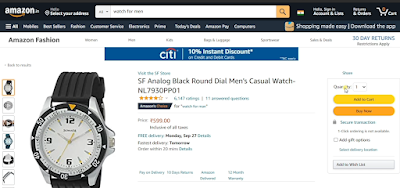
After adding brands and watch types let's add the product, so for adding the product basically we will refer to Amazon products to add to our system. So we will search for watches on Amazon and after that, we will add that to our application. So, as we can see below watch is from Amazon, so let's add it to our system.
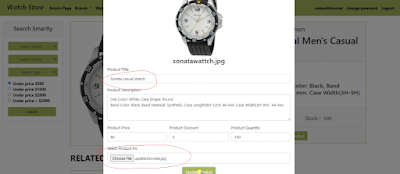
So for adding it to our system, firstly we have to save the watch image, and then we will also its title and description, so when we click on the Add product card we will be able to see the below page.
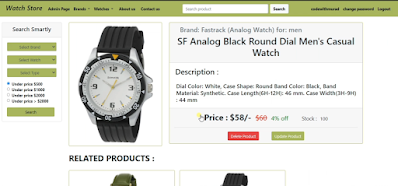
In the above image, we can see, we have to fill in mandatory information like Product Title, Description, Price, Quantity, Discount, select Brands, select Watch Type, select a watch for like Men, Women, Boy or Girls and most importantly we have to select the product image which we have saved earlier.
So, after adding all the important details of the product, when we click on Add product our data will get added into the database and we will be able to see the message on the screen as Watch added Successfully.
Now. let's check whether our watch got added or not.
So, now when we go to the Home page, we will be able to see this product.
After this, Admin can also Update the product. So to update the products admin has to open that product by clicking on it.
Here, Let's Update the product we have just added, for this let's open it.
After opening the product, we will be able to see the product's complete details. And since now we are Admin that's why we are getting the option of Delete and Update product.
So when we click on the update product button, we will get the above interface, so from here we can update product details, like we can see I have updated the title and selected another image for our product. Now when we click on the update button our data will get updated in the database and we will be able to see the message on the screen as the product updated successfully and now we can see the updated product in the below pic.
In a similar manner, Admin can delete any product. For deleting the product admin will just have to click on the delete button after opening that particular product.
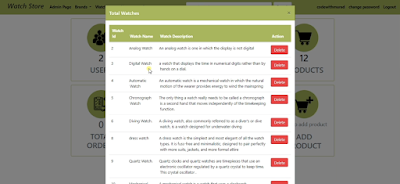
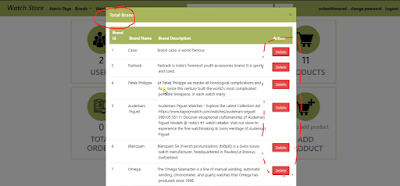
After this, Admin can also delete the whole Watch Brand and Watch Type. In the below picture, we can see the total brands and besides that, we can also see the Delete button.
So, when the admin clicks on the delete button, that particular brand gets deleted and all the products present in that brand get deleted.
In a similar manner, the admin can also delete the watch type this will also work the same as above like delete brands.
So, till now we have seen the functionality which the admin can perform.
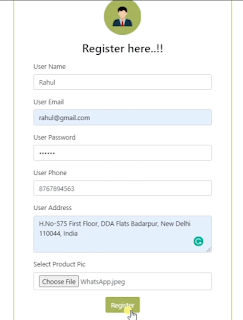
Now, Let's log in as a Customer, for that first register as Customer Rahul.
After entering the proper details, when we click on the register button, data will be added to the database.
So after registration, we will get the message "REGISTRATION SUCCESSFUL".
Now we again try to register as the same email Id then we will get the message "THIS USER IS ALREADY REGISTERED".
Now if we try to log in with the wrong email Id we will get the message as "THIS USER IS NOT REGISTERED".
Here, after login in as a customer Rahul, we will be able to see some more options at the header(Navigation bar) like cart, my orders, change password, and logout as we can see below.
Customers can search the products based on the brands as shown below when the user clicks on any brand all the products under that brand get filtered and displayed on the home page.
In a similar manner, users can filter products based on watch types as shown below.
Apart from this, users can also search the products based on the product title as shown below.
So all the products which will be matched with the searched product title will get displayed on the home page.
After this Customer will get a Cart option where he can his products to the cart. In the below pic, we are able to see CART IS EMPTY because till now Rahul has not added any product to Cart.
The customer will get the My Orders option, where he can see the details of his orders. But since now, the customer has not ordered any products so we are able to see NO ORDERS MADE BY YOU.
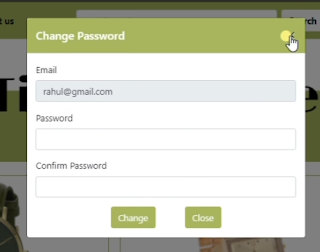
The customer can change his password by clicking on the change password option.
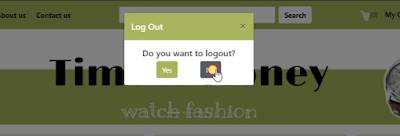
Also, In the navigation customer will get a logout option from where he can log out.
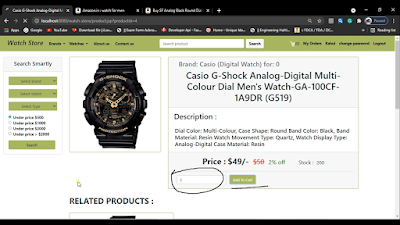
And, now very important customer can order the watch, so for the order firstly customer has to add the watch to the cart so let's add the watch to the cart.
In the above picture, we are adding 2 quantities of Casio G-Shock...... watch into the cart. After clicking on Add to Cart button, we will get the message on the screen as products added to the cart successfully.
And as we can see in the below picture in the navigation bar product in the cart got increased to 1 from 0.
For watching our products in the cart we will click it, so after clicking it we will be able to see the below interface.
And now let's suppose the customer adds the same product to the cart, then this time the new product will not add to the cart instead only its quantity will increase.
so let's customer add the same product with quantity 3 as we can see the quantity of the previous product got increased to 5 refer to the below screenshot.
So in the similar let's add some more products in the Cart. So after adding some more products to the cart it will look like
Also, when the customer views his products in the cart, we get Remove options also. By using this we can remove a particular product from the Cart.
As of now, I'm removing the highlighted product. After clicking on the remove button it will get deleted and show the message on the screen as Product deleted from cart successfully.
And now after adding the required products to the cart, when he clicks the Order button it will get redirected to the PAYPAL's Login page as we can see in the below picture.
So here before successful order, customers have to pay the amount through Paypal. And before payment of course firstly customers have to log in on Paypal.
After entering the correct credentials on the login page of Paypal we will be redirected to the home page of Paypal and there we will be able to see the added products in the cart with tax detail with the total amount to pay as we can see in the below picture.
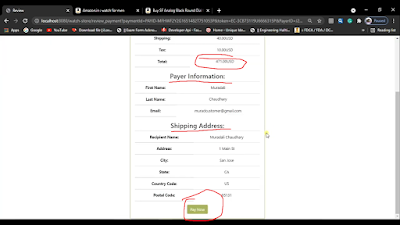
Below this, we will be able to see the Continue button, So when we will click on the Continue button it will redirect us to the review page of our web application as we can see in the below picture.
And now after reviewing it when we click on the Pay Now button, the amount from the customer accounts gets debited and gets credited to the Admin's Account, and after the successful payment products from the cart will get shifted to the My Orders Option and we will be get redirected to the Successful payment page as we can see in the below picture.
So now when we click on the My Orders Option we will be able to see our ordered products refer to below picture.
If we see, the delivery date is in processing for products, Actually, Admin will set the delivery date for the customers.
So this is our Online Shopping System with PayPal integrated using Java.


.png)
5 Comments
Awesome project I got lots of ideas from your project. Thank you love from Malaysia.
ReplyDeleteThanks brother:)
DeleteYour paypal integration looking awesome and thanks for helping to set up
ReplyDeleteThanks for the quick response and setup.
ReplyDeleteThanks a lot for the setup and help running the application :)
ReplyDelete